Pulse Sensor Amped
Live Heartbeats and BPM in your Project. Works with Arduino, micro:bit, littleBits, and most maker platforms.no.
It can be used by students, artists, athletes, makers, and game & mobile developers who want to easily incorporate live heart-rate data into their projects.
It's quick and easy to get reliable pulse readings. Pulse Sensor Amped works with either a 3Volt and 5Volt Arduino.
The kit includes:
- A 24-inch Color-Coded Cable, with a standard male header connectors. Plug it straight into an Arduino or a Breadboard. No soldering is required.
- An Ear Clip, perfectly sized to the sensor. We searched many many places to find just the right clip. It can be hot-glued or epoxied to the back of the sensor to get reading from an ear lobe.
- Parts to make a handy Velcro Finger Strap. This is another great way to get heart-rate data.
- 4 Transparent Stickers, to insulate the front of the Pulse Sensor from oily fingers and sweaty earlobes.
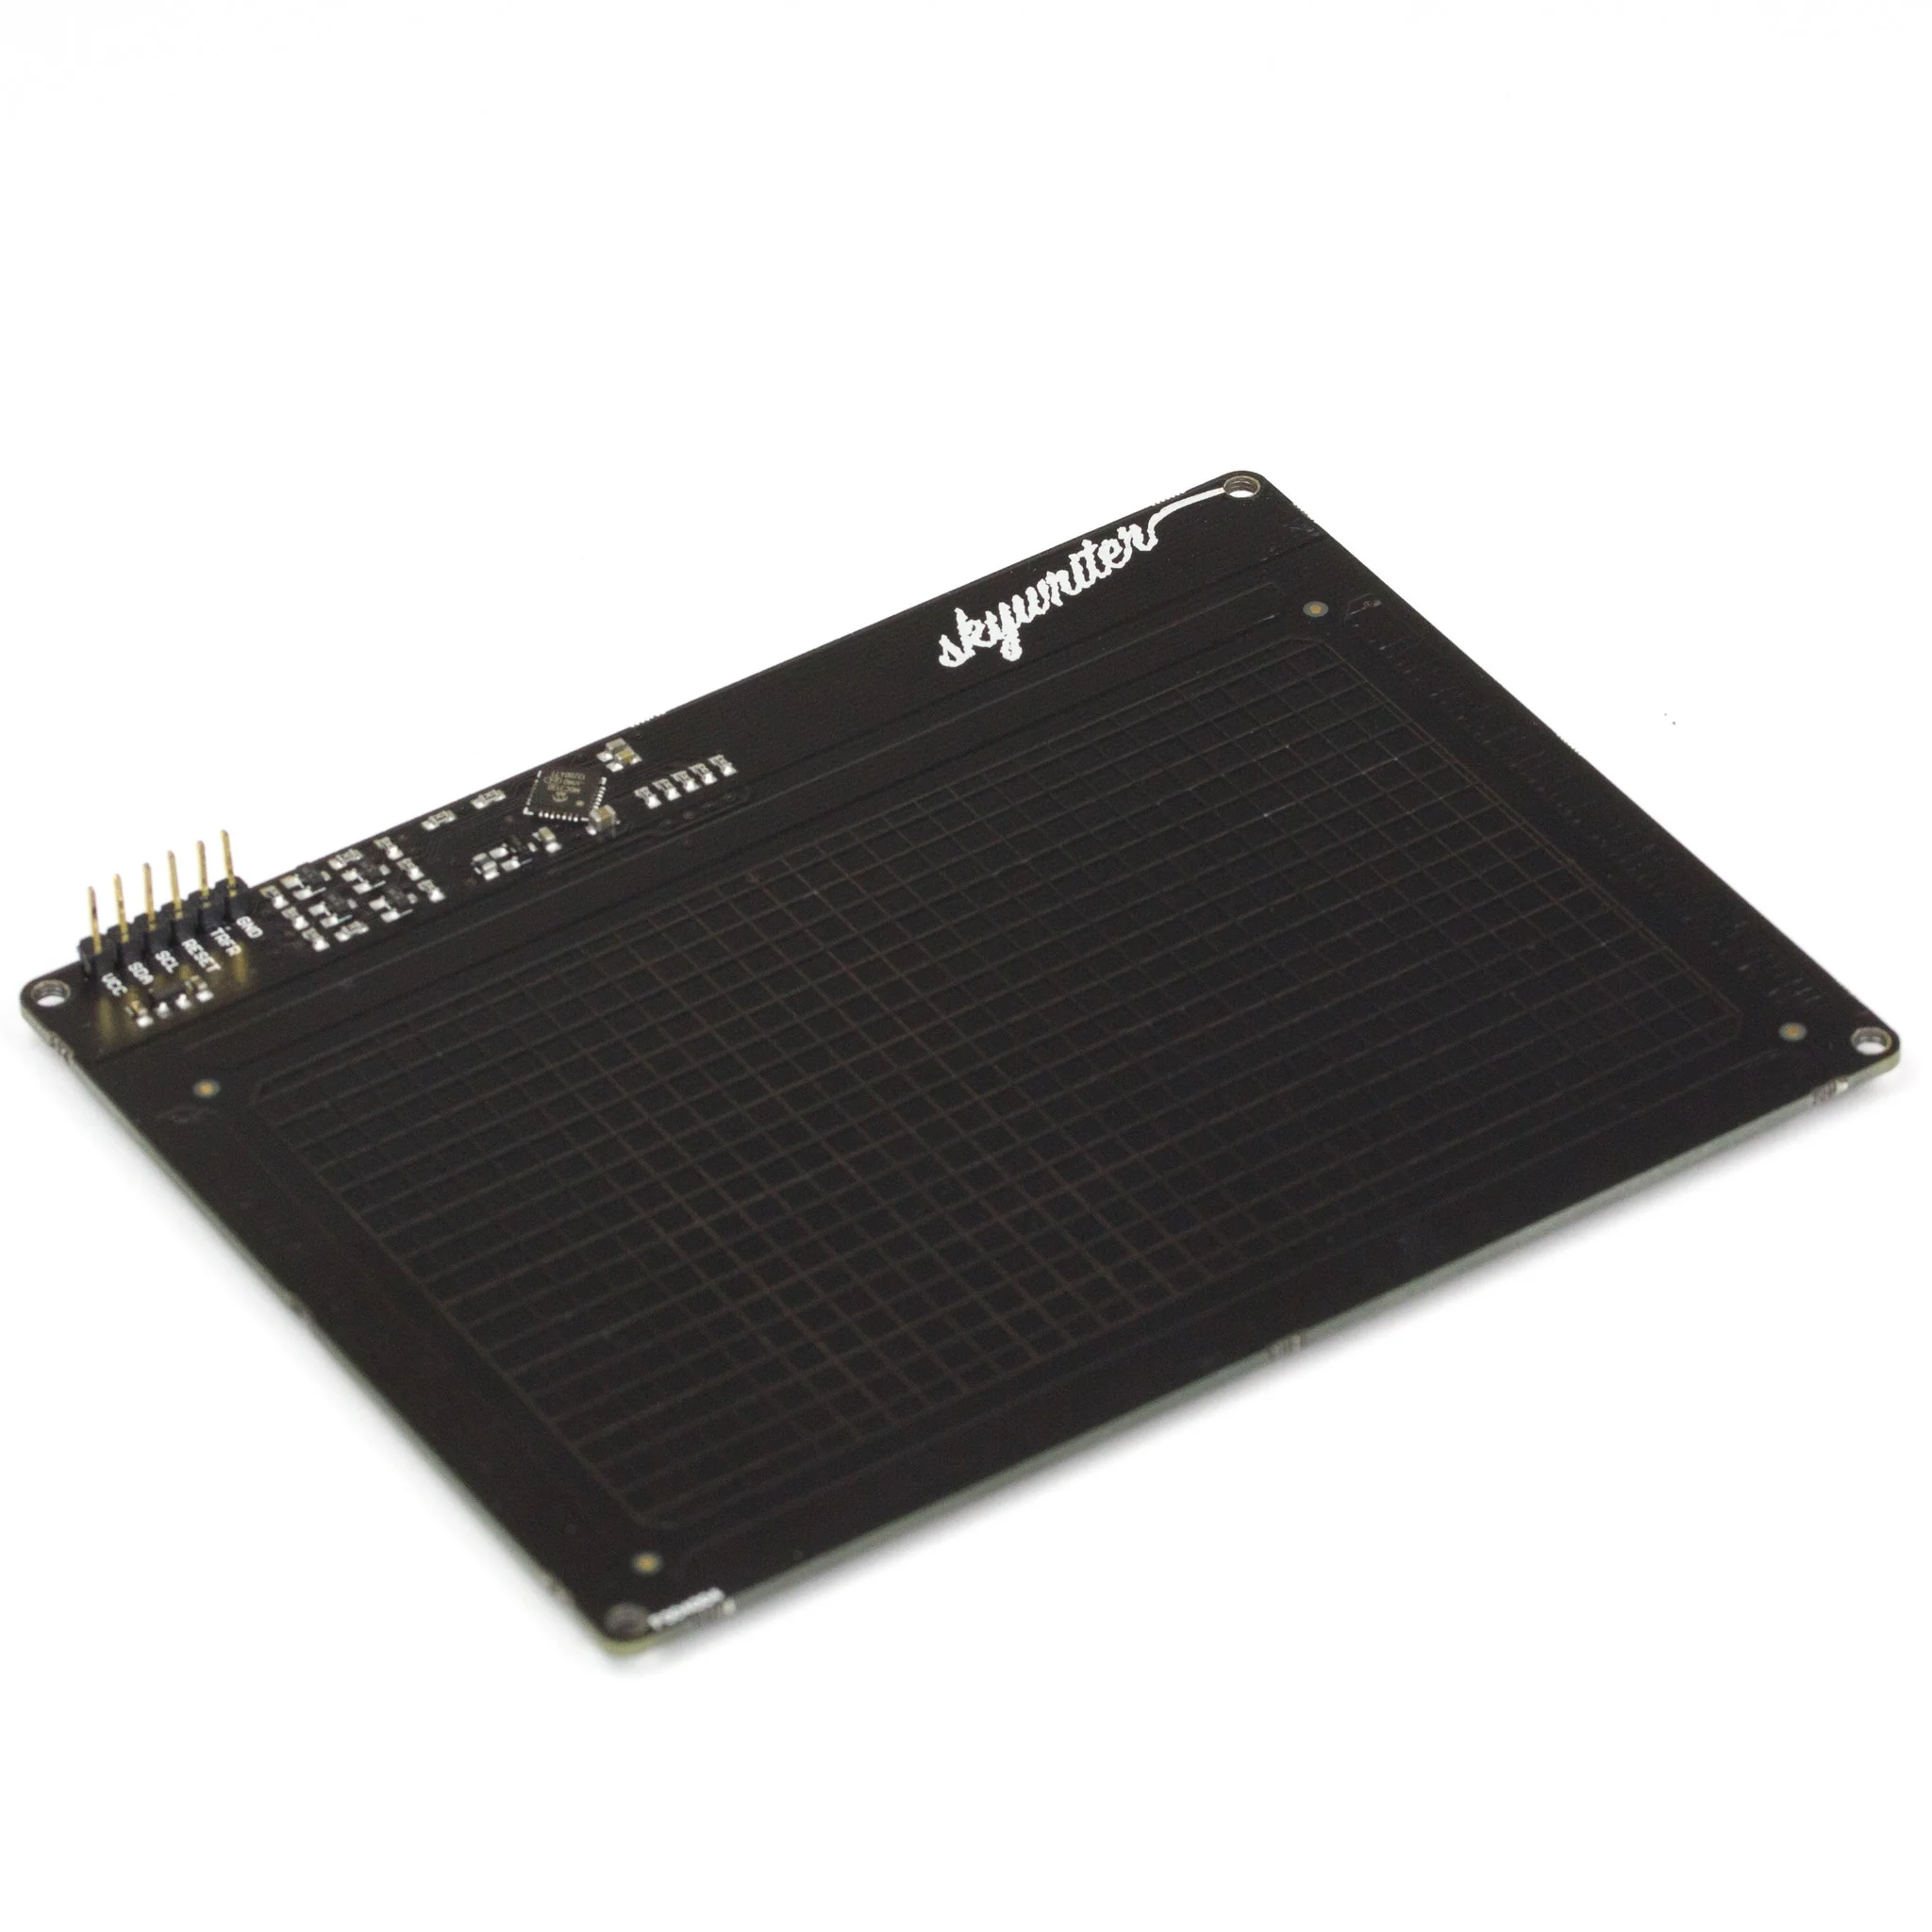
- The Pulse Sensor has 3 holes around the outside edge which make it easy to sew it into almost anything.
- Visualization software (made in Processing) to instantly see output of the sensor and for troubleshooting.
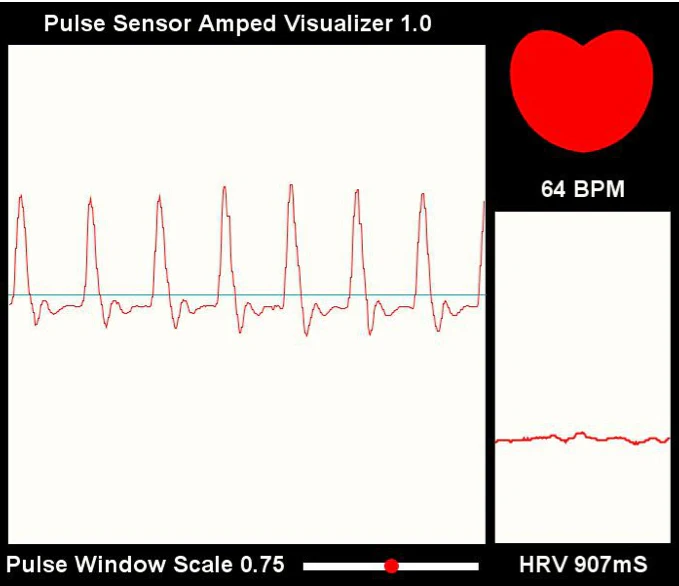
When the Pulse Sensor Amped is just sitting there, not in contact with any fingers or earlobes or other parts, the analog signal hovers around the mid-point of the voltage, or V/2. When Pulse Sensor Amped is in close contact with your fingertip or earlobe (or other part) the change in reflected light when blood pumps through your tissues makes the signal fluctuate around that reference point. In the image below the horizontal line is at V/2.
Arduino watches the analog signal from Pulse Sensor, and decides a pulse is found when the signal rises above the mid-point. That's the moment when your capillary tissues gets slammed with a surge of fresh blood. Then, when the signal drops below the mid-point, Arduino sees this and gets ready to find the next pulse. There's also built in hysteresis to the rising and falling thresholds which you can adjust if necessary.
Original: $17.50
-70%$17.50
$5.25More Images


Pulse Sensor Amped
Live Heartbeats and BPM in your Project. Works with Arduino, micro:bit, littleBits, and most maker platforms.no.
It can be used by students, artists, athletes, makers, and game & mobile developers who want to easily incorporate live heart-rate data into their projects.
It's quick and easy to get reliable pulse readings. Pulse Sensor Amped works with either a 3Volt and 5Volt Arduino.
The kit includes:
- A 24-inch Color-Coded Cable, with a standard male header connectors. Plug it straight into an Arduino or a Breadboard. No soldering is required.
- An Ear Clip, perfectly sized to the sensor. We searched many many places to find just the right clip. It can be hot-glued or epoxied to the back of the sensor to get reading from an ear lobe.
- Parts to make a handy Velcro Finger Strap. This is another great way to get heart-rate data.
- 4 Transparent Stickers, to insulate the front of the Pulse Sensor from oily fingers and sweaty earlobes.
- The Pulse Sensor has 3 holes around the outside edge which make it easy to sew it into almost anything.
- Visualization software (made in Processing) to instantly see output of the sensor and for troubleshooting.
When the Pulse Sensor Amped is just sitting there, not in contact with any fingers or earlobes or other parts, the analog signal hovers around the mid-point of the voltage, or V/2. When Pulse Sensor Amped is in close contact with your fingertip or earlobe (or other part) the change in reflected light when blood pumps through your tissues makes the signal fluctuate around that reference point. In the image below the horizontal line is at V/2.
Arduino watches the analog signal from Pulse Sensor, and decides a pulse is found when the signal rises above the mid-point. That's the moment when your capillary tissues gets slammed with a surge of fresh blood. Then, when the signal drops below the mid-point, Arduino sees this and gets ready to find the next pulse. There's also built in hysteresis to the rising and falling thresholds which you can adjust if necessary.
Product Information
Product Information
Shipping & Returns
Shipping & Returns
Description
Live Heartbeats and BPM in your Project. Works with Arduino, micro:bit, littleBits, and most maker platforms.no.
It can be used by students, artists, athletes, makers, and game & mobile developers who want to easily incorporate live heart-rate data into their projects.
It's quick and easy to get reliable pulse readings. Pulse Sensor Amped works with either a 3Volt and 5Volt Arduino.
The kit includes:
- A 24-inch Color-Coded Cable, with a standard male header connectors. Plug it straight into an Arduino or a Breadboard. No soldering is required.
- An Ear Clip, perfectly sized to the sensor. We searched many many places to find just the right clip. It can be hot-glued or epoxied to the back of the sensor to get reading from an ear lobe.
- Parts to make a handy Velcro Finger Strap. This is another great way to get heart-rate data.
- 4 Transparent Stickers, to insulate the front of the Pulse Sensor from oily fingers and sweaty earlobes.
- The Pulse Sensor has 3 holes around the outside edge which make it easy to sew it into almost anything.
- Visualization software (made in Processing) to instantly see output of the sensor and for troubleshooting.
When the Pulse Sensor Amped is just sitting there, not in contact with any fingers or earlobes or other parts, the analog signal hovers around the mid-point of the voltage, or V/2. When Pulse Sensor Amped is in close contact with your fingertip or earlobe (or other part) the change in reflected light when blood pumps through your tissues makes the signal fluctuate around that reference point. In the image below the horizontal line is at V/2.
Arduino watches the analog signal from Pulse Sensor, and decides a pulse is found when the signal rises above the mid-point. That's the moment when your capillary tissues gets slammed with a surge of fresh blood. Then, when the signal drops below the mid-point, Arduino sees this and gets ready to find the next pulse. There's also built in hysteresis to the rising and falling thresholds which you can adjust if necessary.